
Creating planting plans

Cherry tomatoes, edible flowers, kale, green beans, herbs, and a spicy chile pepper are intensively planted in this 3x6 raised bed.
Dear Gardeners,
Now that you’ve figured out what foods you’d like to grow and the timing in the garden, let’s get to our planting plans. I’m a proponent of intensive planting for several reasons- cuts down on water needs, leaves little to no room for weeds, and allows for continuous harvests. The garden is more interesting and useful when there is always something ready to eat. You’ll hear concerns about airflow but I’ve found that the movement from daily harvests throughout the garden is enough…and I’m not shy about pruning. The garden is not precious. (I mean, they are to my heart but healthy plants are resilient!) Also, the diversity of plants makes your kitchen garden less appealing to pests- say NO the bug buffet.
If you’re newer to growing your own veggies, give yourself space and grace. (My kids roll their eyes at that phrase but I bet they’ll use it with their own little ones…) Start small and expand as you learn. Small plants- your leafy greens and herbs- will be the easiest. They aren’t in the garden very long and don’t require much maintenance outside of regular harvests. A fresh salad is a lovely reward for the effort.
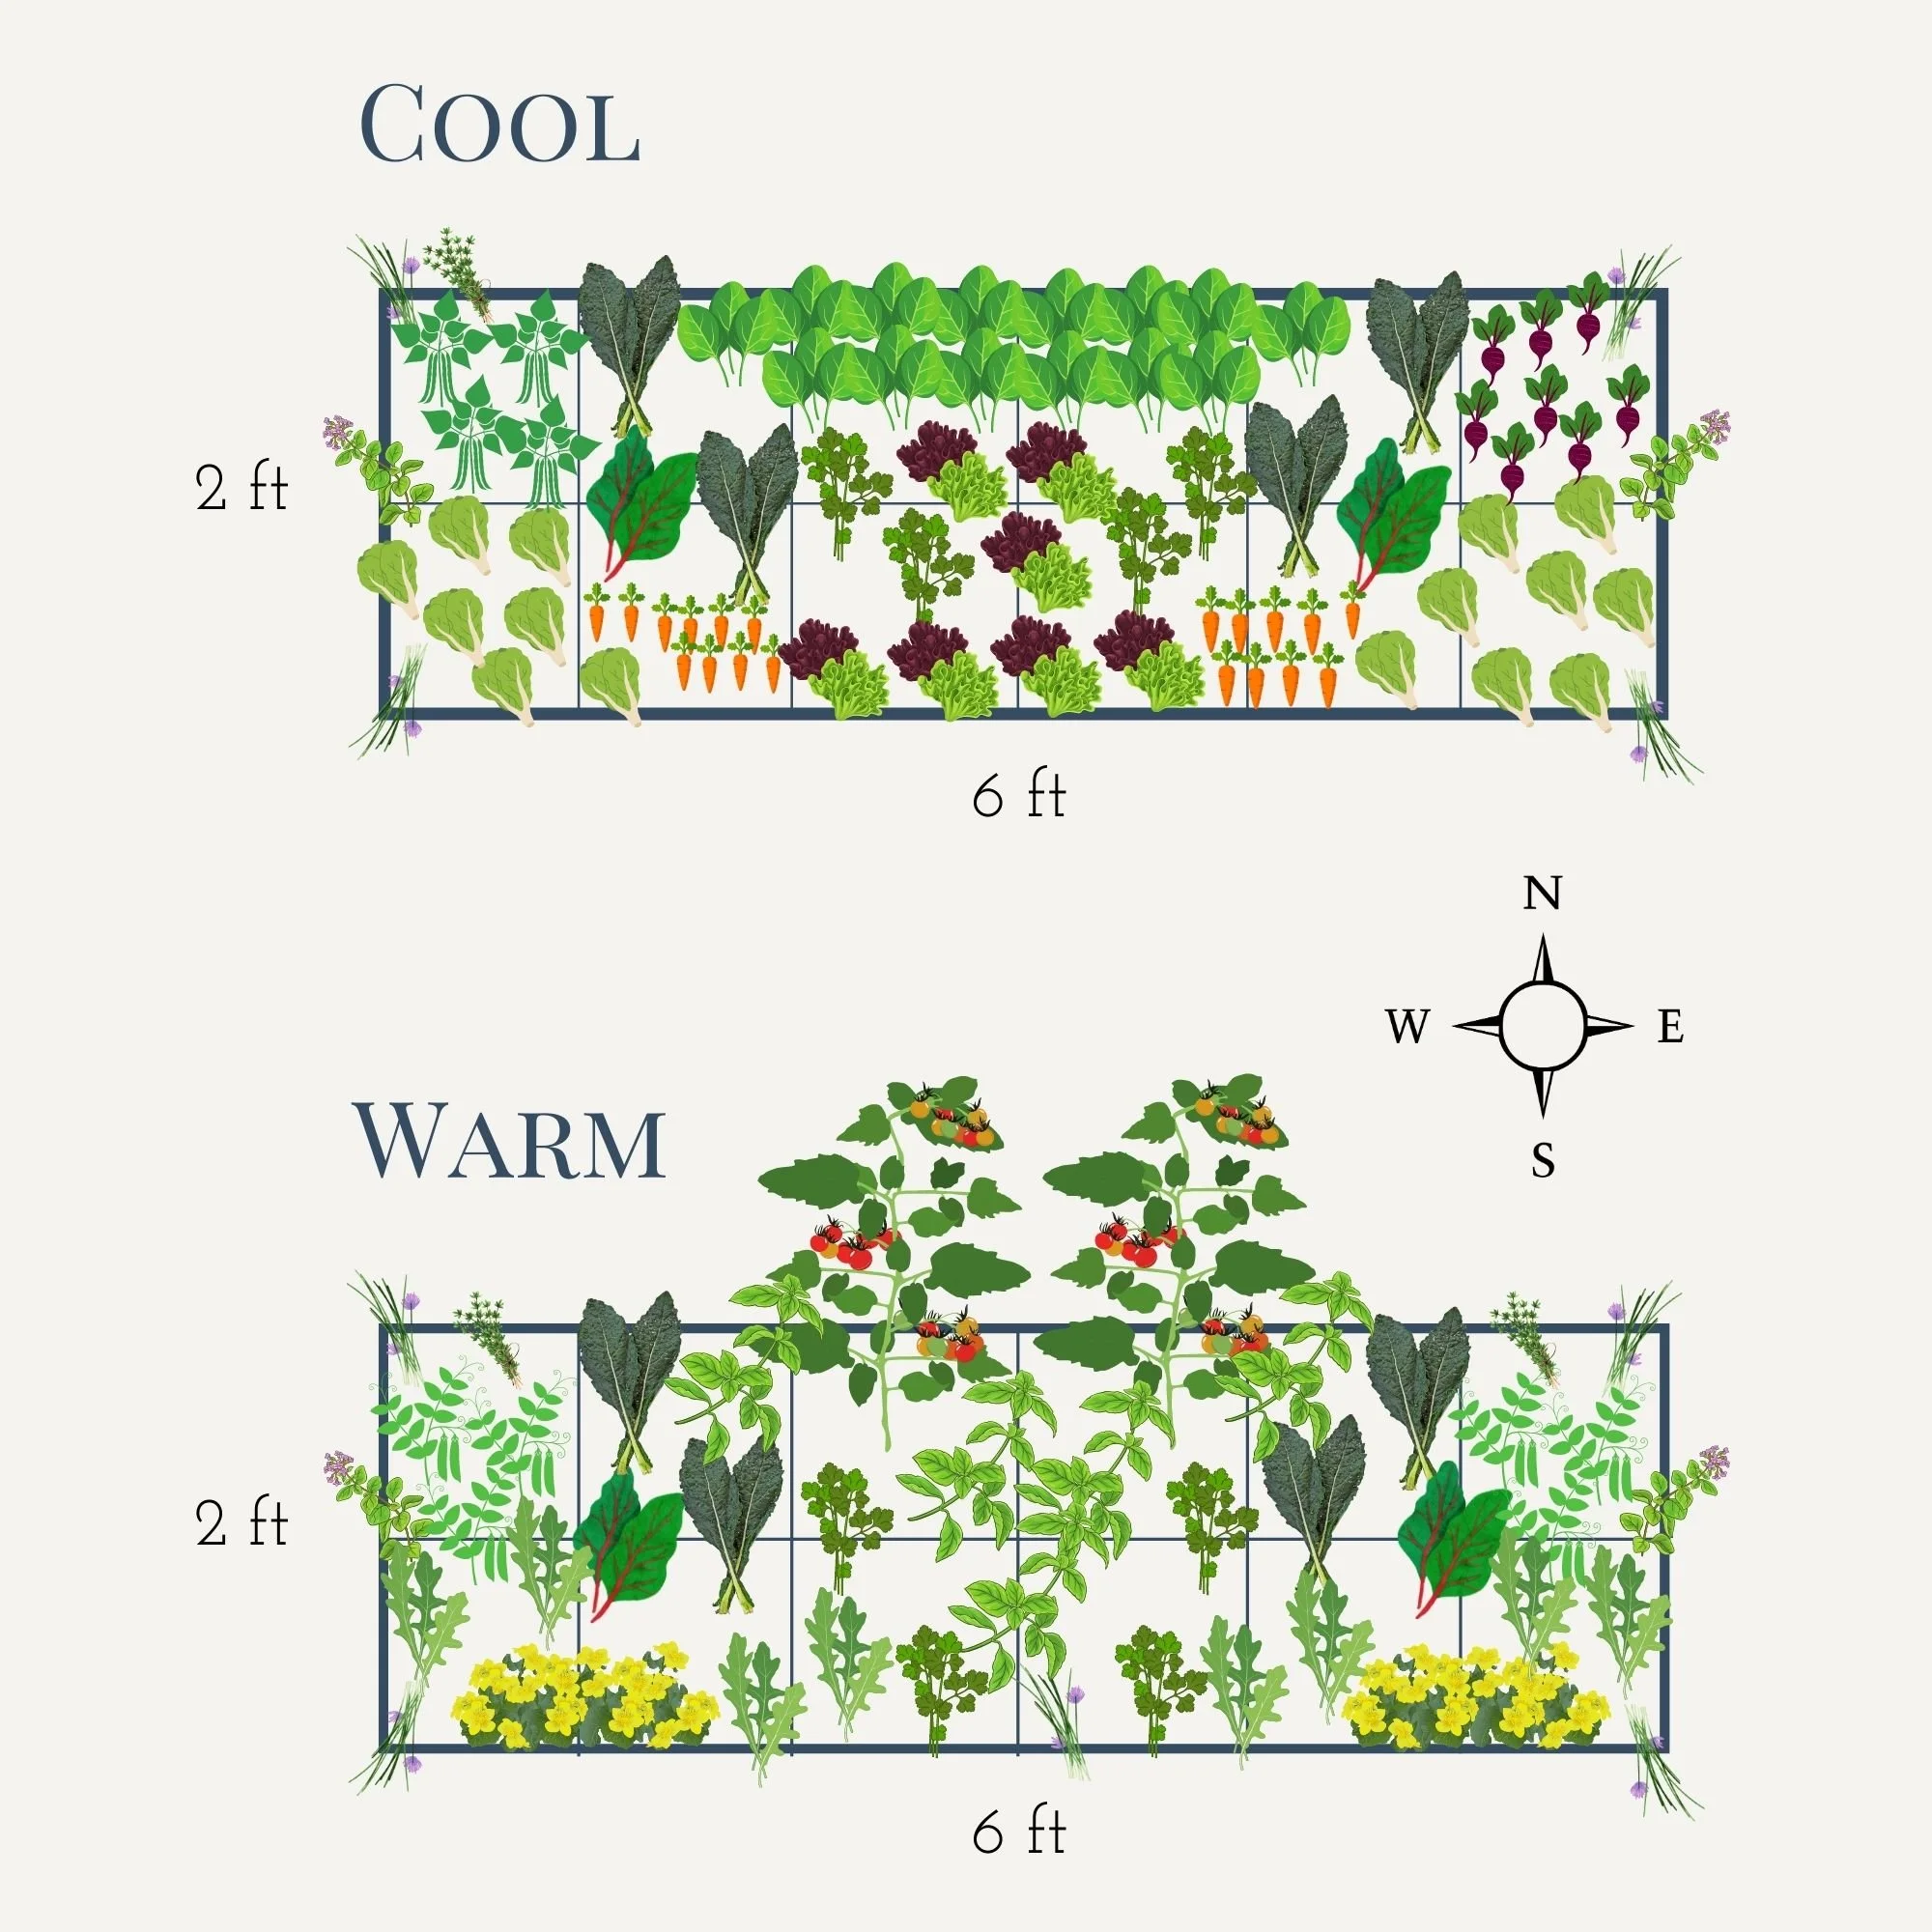
My experience is with raised beds, which is obviously the only option on a city terrace or rooftop, but it’s also my preference for any kitchen garden. A topic for another day! For today, let’s start by drawing our raised beds or containers on graph paper, or use a ruler to create a grid on plain paper. For NYC and the Hudson Valley, I draw each bed three times- cool season 1, warm season, cool season 2. Divide the beds into one square foot sections.
The garden will be constantly tweaked throughout the seasons, as plants are refreshed in succession planting or we cry uncle and pull a struggling vegetable. By categorizing plants by season, size, and duration in the garden, you’ve created a list of interchangeable plants.
Remember that taller plants will create shadows so short sun loving plants should be placed to the south of the taller ones and use the created shadows for greens. In my north or south facing raised beds, I put the tallest plants in the middle, then medium around those, and the smaller plants are along the border, always giving sun loving plants unrestricted access to the southern exposure. But if it’s facing east or west, I’ll place the tallest plants in the northernmost section and graduate the others by descending height. Even in that set up, I tuck some shorter shade tolerant greens along the northern edge. Limit exposed dirt.
To free up growing room, we utilize vertical support, like trellises, panels, or get fancy with an obelisk. Inspired by the book “Kitchen Garden Revival” by Nicole Burke, I invested in two arches last year that each support four massive tomato plants. It requires consistent pruning but takes up as much soil space as, say, parsley. I had previously dedicated two entire 3x8 garden beds to my eight tomatoes. A weedy waste of space. We’ve used them in client beds and the feedback is always the same; they gush about the beauty and productivity. 🍅 🌈 This topic warrants a separate post but it’s important to consider now, as it’s a key element to my abundant approach.
Now for spacing, I’ve found that a lot of the garden-by-the-foot numbers you’ll find online work well. I encourage you, however, to mix it up. Instead of one square foot with only beets, try four beets, two swiss chard, and three spinach plants. Controversial take: don’t waste time on claims that certain plants may NEVER EVER EVER be planted together. There are advantages to companion planting, notably for pest and soil depletion reasons, but nothing that will make or break your garden. You’ll find people who vehemently disagree with me but I can tell you it works beautifully for me and I’m not alone in this approach.
Gardenwell spacing per square foot
Small and short plants: 6-9 (1.3-2 inches apart)
Medium: 2-4 (3-6 inches apart)
Large: 1
For carrots and radish, I pack about 16 per square foot.
Using your list of what you’d like to grow and considering what we’ve discussed today, begin to populate your squares and create your gardens. These plans represent the bed at the fullest expression of the season. The switch from cool to warm and back to cool is gradual; the garden fades into the next seasons with plants being switched as they come to the end of a good run. Since you already have your plants organized by size and duration in the garden, you can loosely plan for these transitions. You could also use the “date to maturity” info on the back of seed packets, or google, but with so many contributing factors, precision is an unrealistic goal.
I’m sharing a cool and warm weather plan for one of my 2x6 beds to help you visualize my approach in action.

If it all feels a bit too overwhelming as a DIY project but you’re ready to grow your own vegetables, let me remind you that our business is all about designing and caring for kitchen gardens. To schedule an on-site consultation in New York City or the Rhinebeck area, follow the button below to complete a short questionnaire. We’ll be in touch shortly.
Please post any questions in the comment section below!
Growing together,
Kiera